
If you guys monitor my work, you'd know that I use the BnW medium quite frequently. I don't use the BnW medium because it's novel or cool but because the BnW medium is simply more useful in strengthening certain images or bringing out what I desire from the images to it's full extent. Colour images are always about colour, but what makes a good BnW image then, since there is no colour. The answer is tones, or shades of grey, as some like to call it, and texture. In the absence of colour, the human brain will always focus on the tones and the textures inherent in the image. In a colour image, vibrant colours create drama, but in a BnW image, the tones do this. Hence, having a wide range of tones in a BnW image is highly desirable.
Traditionally, when BnW film is used, the film doesn't record any colour at all like our digital sensors do today, it simply records tones. The problem is that our brain sees everything in terms of colour, but the great thing is that your brain also sees tones, but you have to recognise it. Look at an object you look at everyday, take a lamp or torch and shine it on that object, does it seem brighter? That's because the object is now reflecting more photons and has a lighter tone. When you look around, you'll realise that some objects have a lighter tone than others(for example someone's face has a lighter tone than their hair, assuming they're asian). It's useful to think of it this way, light green has a lighter tone than dark green and will register on BnW film as a light grey while a dark green object will register as dark grey. Traditionally, photographers use coloured filters such as Red, Yellow, Green, Blue to lighten a particular colour's tone and to darken others. For instance, a deep red filter will make skin tones(which are primarily red) much lighter and will turn a vibrant blue sky into a deep grey. Coloured filters allow light that corresponds to their colour through while filtering out light that is a contrasting colour. Red filters out green and blue, green filters out blue and red and blue filters out red and green. The reason why BnW photographers go through this trouble is that most scenes, if shot without manipulation, turn out very differently from the way the photographer would want them to turn out and will often result in an image with a poor tonal range. Furthermore, certain objects, such as greenery, will always turn up a boring neutral green in a BnW image shot without filters. A deep-red filter (25A) will turn it a more interesting black.
Given modern digital technology and Photoshop, many BnW shooters have converted to making BnW images digitally through the use of software. By shooting a colour image, they can apply an infinite variation of filter factors and even apply different filters to different sections of the image, which transcends the boundaries of traditional BnW imaging. This is done by applying these coloured filters digitally in Photoshop. If you have photoshop, there are 3 ways of doing this.
- Straight Desaturation. This can be done using the Desaturate command (Ctrl+U on a PC or Apple+U on a Mac) and sliding the saturation slider to -100. This is by far the worse way of doing desaturation and should be avoided at all costs for it is equivalent to shooting without any coloured filters at all and will almost always result in a boring BnW image with poor tonal range.
- The best way of doing desaturation is to create a new channel mixer adjustment layer. Using the 'constant' slider will enable you to increase the contrast of your BnW Image. I recommend setting it to -25 for a rather flat scene. The tricky bit is now with the Red, Green and Blue Channel sliders. These simulate the use of coloured filters in traditional BnW photography. Naturally, you can increase the sliders one by one to 100% or more, depending on how much it takes to achieve the original exposure(but remember to set the other sliders to 0% when doing this), to see how each filter affects the image. With experience and keeping the fact that red filters out green and blue, green filters out blue and red and blue filters out red and green in mind, you can even mix the sliders to give you the effect of using a combination of coloured filters at once! This offers the most control but is the hardest way of converting a digital image to BnW. Don't forget to check the monochrome box at the bottom of the Channel Mixer tab.
- A compromise also exists in the form of the Calculations function. There are several preset filter settings which do offer a pretty good end result without much fuss. However, this method reduces the dynamic range of your image substantially, clipping a good amount of shadow details and highlights. It does work wonderfully for flat images though. Try experimenting with this mode, it's pretty fun.
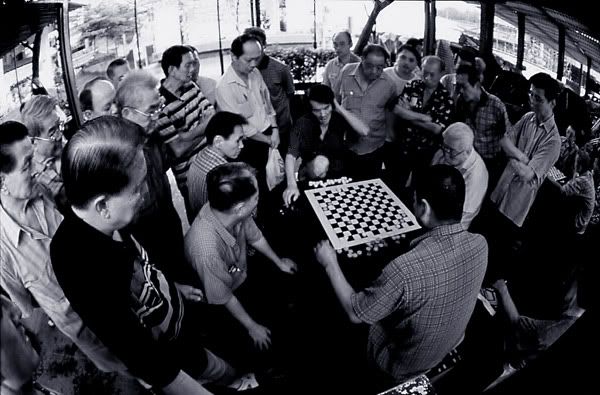
Ultimately, in a BnW image, what you want to achieve is a full range of tones, from pure black to pure white, with a full range of greys in between. Naturally, shooting a scene which has a full range of tones is also vital. As a tip, high contrast scenes work particularly well in BnW. Below is a BnW image I shot some time back. Notice how the tones range from a rich black to pure white? That is a good tonal range.
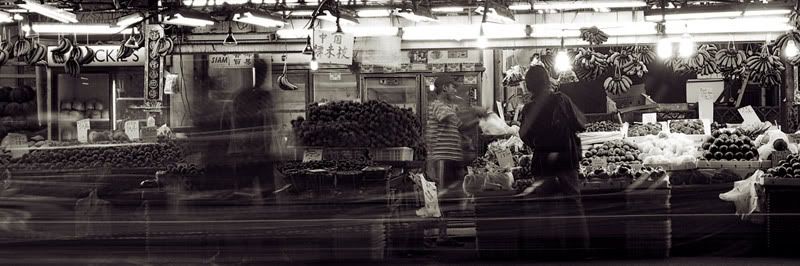
As you get more proficient in BnW imaging, you may want to digitally tone your images. In the past, toning was used by printers(yes printing was formally done in the darkroom and is what you see in the movies when they show shots of a darkroom with red lights. Developing of film is done in total darkness and cannot be filmed) to give prints of a BnW image a particular look. For instance, selenium toned prints had a bluish-purple tinge whereas sepia toned prints were more brownish. The common reddish sepia that you see today is a digital sepia, printers never toned prints that colour. This old picture is a true sepia toned image. This is currently my favourite tone, a rich brown. If you like it, this is a preset tone available for Photoshop CS/CS2 users and can be found under the Mode->Duotone->Quadtone->Pantone. It is the last one in the selection of 4. There is also an excellent selenium tone available under the same folder. These tones were created by a master printer Adobe hired, so make use of them!
![[[My Namecard]]](http://photobucket.com/albums/v229/CSStoned/?action=view¤t=Namecard2006.jpg)